Use this space to put some text. Update this text in HTML

Powered by Blogger.

MKRdezign

Technology

Breaking News

Check it now:

Populars

Contact Form

Name

Email *

Message *

Followers

Recent

Pages

Showing posts with label Computer Tricks. Show all posts

Friday, 29 January 2016

How to earn online?

Hello guys!
Today I'll tell you about some websites where you can earn money at your home. How it will work or what type of websites are these? Here we go

1. adf.ly

Adf.ly website is an earning site. Although it is a less earning site as compared to others but less earning is much better than nothing. First of all open this site and click on Join Now if you haven't. Fill up form with basic information and also fill your account detail (e.g PayPal). Secondly, you have to copy any link and paste in SHRINK bar, it will give you a short link. Now you are able to share this link with your friends if any one of them click on this link he/she will stay 5 sec to view ads which are visible when they click on it. These ads will give you money in dollars and this money will transfer via PayPal to you. 


2. Fiverr.com

Fiverr.com is a site or a market place where you can buy and sell in 5 dollars.If you have any ability to do something like you have fan page on Facebook with a lot of community, programming skills, sketching, writing articles etc then you have to join this site for earning via your skills. You can earn at your home without going out of your home. Open up this site and click on join and fill necessary information and description about your ability which you will do for others. Then people give reviews if you are good at your work and order will be in queue form.


3. Elance.com

Freelancing is a way or just like a job where you can earn at your home or going out your home according to customer wish. Make your portfolio according to your skills, it will give your impression to others then you will get more and more orders. Show your skills. There are mostly people from America, UK and other foreign countries so you can get more money for your talent. Payment will be through PayPal so connect your account with PayPal first. Now you are able to find a job go for it and search job categories where you can find your job according to your taste. Give proposal on that post which job you can do efficiently and on time. Then that person will select any one of them for work.


4. Amazon Mechanical Turk 

It is a very slight micro job for unemployed people. They can work to earn some extra money. Open up this site www.mturk.com and create your account as a worker. Give your EMAIL and password and fill all form to get verified your account. Verification will take time so don't worry about it. After this open you profile and click on HITs, here REQUESTER works are waiting for HITs. They give time to complete their work in time with payment. If you HIT on any request then you have to complete that within time. It is not giving much income but you can earn 4 to 5 dollars in an hour if you're willing to do.

\

5. flipkart.com

It is an online shopping site. If you have product or any material which you wanna sell to others to earn money online and you don't have shop then open up this site and create your account and throw your product in market place with price, quantity and photo of that product. People will order time to time and you will get Email. Manage your order and sell your products online. 


 Earn Money and Enjoy Your Life Happily.

Thursday, 28 January 2016

How to make a Bootable USB?

Today I'm gonna tell you that how to make a Bootable USB in an easy way. Just follow these steps: 


 1. Open your browser and write "Rufus download" in search bar. Rufus can be 2.6 and size will be 847KB.

 2. Download and install it.

3. Now insert your USB in your laptop or computer. Keep in mind that operating system doesn't   matter where it is 64bit or 32bit.

 4. Click on your installed software "Rufus". It looks like this.


5. Now select "ISO image" from your computer which you wanna make a bootable.


6. Click start and wait until it's complete.

Enjoy your bootable USB. :)


Tuesday, 24 June 2014

Free Internet Tricks


UPERB AIRTEL 3G OPERA MINI TRICK FOR LARGE DWNLDG 
My Dear friends, Air3g2.jpeg Features:
= High Speed Parallel Downloads
= Working Both in PC and Andriods
= Java and android Mobiles using
handlers
= No Sim Blocking. Proxy : 82.145.210.160
Port : 80
Apn : airtelgprs.com CONFIGURATION SETTING : Handler Settings :
Proxy type : HTTP
Proxy server :
1=ic.bsbportal.com
2=airtellive.com
3=get.hike.in/airtel 4=g.co/freezone
5=h.facebook.com or any other free
ip
571370076217603

Friday, 20 June 2014

These Keys Work In All Browsers

Ctrl+1-8 – Switch to the specified tab, counting from the left.

Ctrl+9 – Switch to the last tab.

Ctrl+Tab – Switch to the next tab – in other words, the tab on the

right. (Ctrl+Page Up also wok)


Ctrl+Shift+Tab – Switch to the previous tab – in other words, the

tab on the left. (Ctrl+Page Down also works)


Ctrl+W, Ctrl+F4 – Close the current tab.

Ctrl+Shift+T – Reopen the last closed tab.

Ctrl+T – Open a new tab.

Ctrl+N – Open a new browser window.

Alt+F4 – Close the current window.

Mouse Actions for Tabs

Middle Click a Tab – Close the tab.

Ctrl+Left Click, Middle Click – Open a link in a background tab.

Shift+Left Click – Open a link in a new browser window.

Ctrl+Shift+Left Click – Open a link in a foreground tab.

Navigation

Alt+Left Arrow, Backspace – Back.

Alt+Right Arrow, Shift+Backspace – Forward.

F5 – Reload.

Ctrl+F5 – Reload and skip the cache, re-downloading the entire

website.

Escape – Stop.

Alt+Home – Open homepage.

Thursday, 19 June 2014

How To Hide File Behind Image ?


How To Hide File Behind Image ?


1. Select an image to be used for hiding file behind the image.

2. Now select a file to hide behind the image and make it in .RAR format. With the help of the WinRAR.

3. And most important is that paste both the files on desktop.

4. Now open cmd by going to Start > Accessories > Command

Prompt and type following commands in it.
cd desktop

5. CD stands for change directory by typing above command you

change your directory to desktop. After then type this command:

Copy /b imagename.jpg + filename.rar finalimage.jpg

Replace imagename.jpg with the name of image you want your file

to be hidden behind. Don't forget to add image format (Eg:

.jpg,.png,.gif)

Replace filename with name of your file you want to hide. It must

be in .rar format.

Finally Replace final image.jpg with whatever name you want your

final image with hidden files should be. You file will be hidden

behind this image.

6. Now when you will try to open this newly created image it will

be open as normal image, but to open this hidden file you need to

following steps:

How To Access Hidden File ?

To access your hidden file you need to open the newly created

image in winrar. Just follow these steps to do that:

1. Firstly you need to Open winrar

2. Now locate your image and drag or open your image in WinRaR.

3. Now at the end Extract the file and done.

Security Tips To Avoid Virus

Security tips to Avoid Virus /Trojan/ Key-logger Infection

1. Install a good antivirus. Free or Paid both are good, but kindly don't used cracked versions.

2. Now Install real-time anti-spyware protection

3. Update your Anti-virus programs daily.

4. Perform scans on your computer daily.

5. Disable auto-run to prevent infection from pen-drives.

6. Disable image previews if using Outlook

7. Use authentic anti-virus which has browser plugins and scans all URL's for unauthorized content.

8. Always use Hardware based Firewall.

9. Don't click on any mail links or attachments from unknown sources or malicious users.

10. Never download software's from third-party sites. Download from original website. Do not use any crack version it may be contain dangerous virus.

************************************************************************************

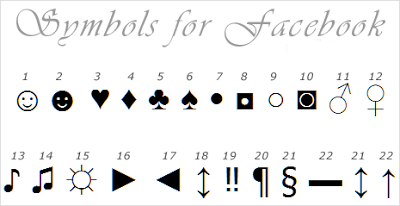
HOW TO MAKE SYMBOLS WITH KEYBOARD


Alt + 0153..... ™... trademark symbol
Alt + 0169.... ©.... copyright symbol
Alt + 0174..... ®....registered trademark symbol
Alt + 0176 ...°......degree symbol
Alt + 0177 ...±....plus-or-minus sign
Alt + 0182 ...¶.....paragraph mark
Alt + 0190 ...¾....fraction, three-fourths
Alt + 0215 ....×.....multiplication sign
Alt + 0162...¢....thecent sign

Alt + 0161.....¡......upside down exclamation point

Alt + 0191.....¿.....upside down question mark

Alt + 1...........smiley face

Alt + 2 ......☻.....black smiley face

Alt + 15.....☼.....sun

Alt + 12......♀.....female sign

Alt + 11.....♂......male sign

Alt + 6............spade

Alt + 5.............Club

Alt + 3............. Heart

Alt + 4.............Diamond

Alt + 13......♪.....eighth note

Alt + 14......♫......beamed eighth note

Alt + 8721.... ∑.... N-ary summation (auto sum)

Alt + 251.....√.....square root check mark

Alt + 8236.....∞.....infinity

Alt + 24.......↑.....up arrow

Alt + 25......↓......down arrow

Alt + 26.....→.....right arrow

Alt + 27......←.....left arrow

Alt + 18.....↕......up/down arrow

Alt + 29......↔... left right arrow

Give it a try !!

PHOTO VERIFICATION

Hey Most of the people asks about photo Block verification  
so i am Posting about it  
just give us a single thanks !!  
PHOTO VERIFICATION

Step 1: Go to Google images
search

Step 2: Type Facebook "name of
1st friend" copy and paste
from blocked account

Step 3: Search , you will see the
picture of the 1st friend in
the 1st 3 results

Step 4:If you didn't identify the
picture, repeat the same

Step 5:If you didn't identify the
friend.simply skip the
picture and you will get another
one (always you have 2
skips/picture)
This is the new method to verify
the photos even if the
profile is blocked:

Step 6: After you identify the 5
pictures Facebook will ask
you to change your password and
email password

Step 7: Change your Facebook
account password and
confirm that you change your
email password (even you
don't)

Step 8: Now every thing is OK

Step 9: If you see this message
(no verification method is
available now) just Logout and
wait 1 hour to Llogin, if you
failed to verify the photos,
Facebook will give you 1
chance to verify 5 pictures every One
hour. 

How to Change your IP


How to Change your IP:-

----------------------------------------------
1. Click on "Start" in the bottom left hand corner of screen
2. Click on "Run"
3. Type in "cmd" and hit ok You should now be at an MSDOS prompt screen.

4. Type "ipconfig /release" just like that, and hit "enter"
5. Type "exit" and leave the prompt
6. Right-click on "Network Places" or "My Network Places" on your desktop.
7. Click on "properties You should now be on a screen with
something titled "Local Area Connection", or something close to that, and, if you have a network hooked up, all of your other networks.
8. Right click on "Local Area Connection" and click "properties"
9. Double-click on the "Internet Protocol (TCP/ IP)" from the list under the "General" tab
10. Click on "Use the following IP address" under the "General" tab
11. Create an IP address (It doesn't matter what it is. I just type 1 and 2 until i fill the area up).
12. Press "Tab" and it should automatically fill default numbers  in the "Subnet Mask" section.
13. Click "Ok" button.
14. Click "Ok" button again You should now be back to the "Local Area Connection" section.
15. Right-click back on "Local Area Connection" and go to properties option.
16. Go back to the "TCP/IP" settings.
17. This time, select "Obtain an IP address automatically”
18. Click on "Ok" button.
19. Click  "Ok" again
20. Now you have a new IP address.

Tips To Extend Your Laptop’s Battery Life!


1. Lower your screen brightness

Depending upon the working environment , always change the brightness of your laptop’s screen . If you have a Laptops without LED screen , reducing the backlight also helps to save a lot of power .


2. Disable programs running in the background

Windows has many background processes running without the users knowledge . Even many programs installed by the user are enabled to run automatically on the startup . disabling these programs from the task manager will decrease the system resource usage of your laptop and help extend its battery life . When possible always try to run one program in an instance .

3. Remove external devices

External devices like USB flash drives or external CD drives consume a lot of power from your battery . disconnecting the devices when they are not in use stops drainage of power from your laptops battery and extends its life .


4. Don’t use the CD drive

Optical disk drives consume a lot of power . these drives spin and waste power even when the drive is not in use . Use Daemon tools lite , a free application that converts your CD’s and DVD’s into ISO images that can be stored on your hard disk or accessed via virtual drives.

5. Defragment your Hard disk

A hard disk which is not defragmented regularly tends to spin more to access data . Defragmenting a hard disk regularly ensures that your hard disk has to spin less , which in turn extends your laptops battery life .

6. Take care of your battery

Batteries require a lot of maintenance . follow these simple trick to extend the battery life . Do not ever leave your battery on charge for a long period of time or work on it while its charging , this will affect the battery’s life negatively . Batteries leak charge if they are left idle so it is advised to regularly use your laptop once it is charged .

7. Use standby instead of hibernate

Whenever you pause from your work , always put the laptop into hibernate instead of standby . Standby mode keeps on draining your laptops battery . People mostly don’t know the difference between these two modes and end up to use standby which helps to continue their work instantly . Avoiding the standby mode extends the laptops battery life .

8. Lower graphic usage

Play graphic intensive games can drain a lot of power within a short period of time . try playing games on the lowest setting to maximize your laptop’s battery life .

9. Turn down the volume

Do not use play music through laptop speakers frequently . Invest in a headphone or a earphone . This helps to extend its the battery life .

10. Disable WiFi and Bluetooth when not needed

WiFi and Bluetooth drain too much power from a battery . To extend your laptop’s battery life these features must be always disable when not in use .

11. Avoid extreme temperature

Batteries perform the best in a cool environment and Extreme temperatures have serious effects on a battery’s life .Under load batteries tend to dissipate more amount of heat . To counter these , always try to use a laptop under a fan . Additionally you can use a portable laptop cooling pad to dissipate the heat released inside the laptop and the battery . A portable laptop cooling pad is a must have which helps to a lot to extend yits battery life .

Tthese are the basics to extend a laptops battery life but are very effective . we will be discussing about advanced tips to extend a laptops battery life in our next article . If you liked this post then do share your comments and share us with your friends 
.


LIST OF WINDOWS 7 RUN COMMAND


Press Windows logo key + R then type the command

and Ctrl + F para sa search

Add/Remove Programs = appwiz.cpl
Administrative Tools = control admintools
Authorization Manager= azman.msc "New"

Calculator = calc 
Certificate Manager = certmgr.msc 
Character Map = charmap 
Check Disk Utility = chkdsk 
Control Panel = control "New"
Command Prompt = cmd.exe
Component Services = dcomcnfg 
Computer Management = compmgmt.msc = CompMgmtLauncher "New"

Date and Time Properties = timedate.cpl
Downloads = Downloads "New"
Device Manager = devmgmt.msc
Direct X Troubleshooter = dxdiag
Disk Cleanup Utility = cleanmgr
Disk Management = diskmgmt.msc
Disk Parmelonion Manager = diskpart 
Display Properties = control desktop or desk.cpl
DPI Scaling = dpiscaling "New"
Driver Package Installer = dpinst "New"
Driver Verifier Utility = verifier or /reset
DVD Player = dvdplay "New"

Encryption File System = rekeywiz "New"
Event Viewer = eventvwr.msc

Fax Cover Sheet Editor = fxscover "New"
File Signature Verification Tool = sigverif 
Folders Properties = control folders 
Fonts = control fonts
Free Cell Card Game = freecell

Group Policy Editor = gpedit.msc

Internet Explorer = iexplore 
Iexpress Wizard = iexpress
Internet Properties = inetcpl.cpl
IP Configuration = ipconfig.exe
iSCSI Initiator = iscsicpl "New"

Keyboard Properties = control keyboard

Libraries = explorer or Windows key + E
Local Security Settings = secpol.msc
Local Users and Groups = lusrmgr.msc
Logs You Out Of Windows = logoff

Microsoft Support Diagnostic Tool = msdt "New"
Microsoft Office Document = winword "New"
Microsoft Paint = mspaint.exe
Mouse Properties = control mouse
Mouse Properties = main.cpl
Mobility Center (only on mobile) = mblctr or Windows key + X
Network Connections = control netconnections
Network Connections = ncpa.cpl
Notepad = notepad 

ODBC Data Source Administrator = odbcad32 "New"
Optional Features Manager = optionalfeatures "New"
On Screen Keyboard = osk or Windows key + U 

Performance Monitor = perfmon.msc
Phone and Modem Options = telephon.cpl 
Power Configuration = powercfg.cpl
Printers and Faxes = control printers
Printer Migration = PrintBrmUi "New"
Private Character Editor = eudcedit

Regional Settings = intl.cpl
Registry Editor = regedit.exe
Remote Assistance = msra "New"
Remote Desktop = mstsc
Resultant Set of Policy = rsop.msc

Scheduled Tasks = control schedtasks
Security Center = wscui.cpl
Services = services.msc
Shared Folders/MMC = fsmgmt.msc
Shuts Down Windows = shutdown 
Snipping Tool = snippingtool "New"
Sounds and Audio = mmsys.cpl
Sound Recorder = soundrecorder "New"
Sound Volume = sndvol "New"
Spider Solitare Card Game = spider
SQL Client Configuration = cliconfg
Stored User Names and Passwords = credwiz "New"
Sticky Note = StikyNot "New"
System Configuration Editor = sysedit
System Configuration Utility = msconfig
System File Checker Utility = sfc
System Information = msinfo32
System Properties = sysdm.cpl or Windows key + Pause/Break

Task Manager = taskmgr 
Trusted Platform Module = TpmInit "New"

Utility Manager = utilman
User Accounts = netplwiz or control userpasswords2

Windows Activation = slui "New"
Windows Backup Utility = sdclt "New"
Windows Fax and Scan = wfs "New"
Windows Firewall = firewall.cpl
Windows Firewall with Advanced Security = wf.msc "New"
Windows Image Acquisition = wiaacmgr "New"
Windows Media Player = wmplayer
Windows Magnifier = magnify
Windows Management Infrastructure = wmimgmt.msc
Windows Update App Manager = wuapp "New"
Windows Standalong Update Manager = wusa "New'
Windows System Security Tool = syskey
Windows Share Creation Wizard = shrpubw "New"
Wordpad = write

Windows 8 Shortcut Keys


Shortcut Description
 
Windows Key + D Show Desktop
 
Windows Key + C Open Charms Menu
 
Windows Key + F Charms Menu – Search
 
Windows Key + H Charms Menu – Share
 
Windows Key + K Charms Menu – Devices
 
Windows Key + I Charms Menu – Settings
 
Windows Key + Q Search For Installed Apps
 
Windows Key + W Search Settings

Windows Key + Tab Cycle through open Modern UI Apps

Windows Key + Shift + Tab Cycle through open Modern UI Apps in reverse order

Windows Key + . Snaps app to the right (split screen multitasking)

Windows Key + Shift + . Snaps app to the left (split screen multitasking)

Windows Key + , Temporarily view desktop

Alt + F4 Quit Modern UI Apps

Windows Key + E Launch Windows Explorer Window

Windows Key + L Lock PC and go to lock screen

Windows Key + T Cycle through icons on taskbar (press Enter to launch app)

Windows Key + X Show Advanced Windows Settings Menu
Windows Key + E Launch Windows Explorer Window

Windows Key + Page Down Moves Start screen and apps to secondary monitor on the right

Windows Key + M Minimize all Windows

Windows Key + R For Open Run dialog box

Windows Key + Down Arrow Minimize current window

Windows Key + Left Arrow Maximize current window to left side of the screen

Windows Key + Right Arrow Maximize current window to right side of the screen

Ctrl + Shift + Escape Open Task Manager

Windows Key + Print Screen Takes a Print Screen and saves it to your Pictures folder

Windows Key + Page Up Moves Start screen and apps to secondary monitor on the left

Windows Key + Pause Break Display System Properties

Shift + Delete Permanently delete files without sending it to Recycle Bin

Windows Key + 0 to 9 Launch/show app pinned to taskbar at indicated number

Windows Key + Shift + 0 to 9 Launch new instance of app pinned to taskbar at indicated number

Alt + Enter Display Properties of selected item in File Explorer

Alt + Up Arrow View upper level folder of current folder in File Explorer

Alt + Right Arrow View next folder in File Explorer

Alt + Left Arrow View previous folder in File Explorer

Windows Key + P Choose secondary display modes

Alt + Print Screen Print Screen focused Window only

Windows Key + Spacebar Switch input language and keyboard layout

Windows Key + Shift + Spacebar Switch to previous input language and keyboard layout

Windows Key + Enter Open Narrator

Windows Key + + Zoom in using Magnifier

Windows Key + - Zoom out using Magnifier